This week I’ve been attending my first ever virtual meeting, the International Symposium on Olfaction and Taste (ISOT for short).
While technically this means I didn’t have a lot of time to implement new things, I still managed to get some work done and I hope that you will learn a lot of things from this blog post.
Bringing MD trajectories to RDKit
I finally added coordinates to the converter, so you can now properly read a trajectory:
sel = universe.select_atoms("resname LRT")

for ts in u.trajectory:
    mol = sel.convert_to("RDKIT")
The resulting molecule will contain a conformer with the coordinates of the current frame.
And don’t worry about efficiency, the topology of the molecule is not rebuilt for every frame, it is cached based on the id of the AtomGroup and the arguments that were passed to the converter.
In the end the MDAnalysis AtomGroup is converted to an RDKit molecule once and cached, and to create each conformer the cached molecule is copied and we simply add the current frame’s coordinates.
This pretty much brings an end to the second part of my GSoC project, hooray 🎉
How to create GIFs in Python
Here is a code snippet to create a gif of the trajectory with RDKit:
import MDAnalysis as mda
from rdkit.Chem import Draw
from nglview.datafiles import PDB, XTC

u = mda.Universe(PDB, XTC)
elements = mda.topology.guessers.guess_types(u.atoms.names)
u.add_TopologyAttr('elements', elements)
ag = u.select_atoms("resname LRT")

pngs = []
for ts in u.trajectory:
    mol = ag.convert_to("RDKIT")
    mol = Chem.RemoveHs(mol)
    img = Draw.MolToImage(mol, size=(500,400), legend=f"Frame {ts.frame}")
    pngs.append(img)

img, *imgs = pngs
img.save(fp="traj.gif", format='GIF', append_images=imgs,
         save_all=True, duration=200, loop=0)
The img, *imgs = pngs line is the same as writing img = pngs[0]; imgs = pngs[1:]
Here’s the result (you can convert the .gif to a .webm video online):
Draw.MolToImage returns a PNG image through the PIL library which is automatically installed with RDKit, and PIL can be used for reading and writing images in a variety of formats.
You can modify the time between each frame with the duration parameter by either passing an integer in milliseconds, or a list of int for each frame.
If you’d rather use the SVG drawer to highlight some particular atoms, here’s another snippet. We’ll also rotate the trajectory along the z axis to have a clearer view:
from PIL import Image
import cairosvg
import io

# add a rotation transformation for every timestep of the trajectory
rotate = mda.transformations.rotate.rotateby(30, [0,0,1], ag=ag)
u.trajectory.add_transformations(rotate)

def output_svg(mol, legend="", atoms=[], color=(0,.9,0), size=(700, 400)):
    d = Draw.rdMolDraw2D.MolDraw2DSVG(*size)
    opts = d.drawOptions()
    highlight_atoms = {atom: color for atom in atoms}
    kwargs = dict(
        legend=legend,
        highlightAtoms=atoms,
        highlightAtomColors=highlight_atoms,
    )
    Draw.rdMolDraw2D.PrepareAndDrawMolecule(d, mol, **kwargs)
    d.FinishDrawing()
    return d.GetDrawingText().replace('svg:','')

svgs = []
for ts in u.trajectory:
    mol = ag.convert_to("RDKIT")
    mol = Chem.RemoveHs(mol)
    img = output_svg(mol, legend=f"Frame {ts.frame}", atoms=[8])
    svgs.append(img)

img, *imgs = [Image.open(io.BytesIO(cairosvg.svg2png(bytestring=f)))
              for f in svgs]
img.save(fp="traj.gif", format='GIF', append_images=imgs,
         save_all=True, duration=200, loop=0)
A new API for converters
I’ve also been working on the new API for converters. We currently have converters for ParmEd and RDKit.
We wanted something that could be tab-completed, while not cluttering the namespace of the AtomGroup class (so we can’t just add to_rdkit, to_parmed…etc.) and also keeping the current converter syntax.
Pandas does this really nicely with df.plot, which can both be called with df.plot(kind='scatter', ...) or df.plot.scatter(...), so I decided to follow the same direction.
The trick to using plot as both a method and an object of its own is to use what Pandas calls an accessor. The accessor gives you access to another class in an object oriented manner, so that you don’t have to call df.plot.scatter(df, ...).
Let’s use a simple example to understand how it works, using a very simple molecule class and a class that defines descriptors (based on our favorite chemoinformatics module of course):
from rdkit import Chem
from rdkit.Chem import Descriptors

class DescriptorWrapper:
    """A class to describe molecules"""
    def __init__(self, molecule):
        self.molecule = molecule
    def __call__(self):
        print(f"I am {Chem.MolToInchiKey(self.molecule.rdmol)}, but you can call me {self.molecule.name}")
    def count_atoms(self, heavy_only=False):
        count = self.molecule.rdmol.GetNumHeavyAtoms() if heavy_only else self.molecule.rdmol.GetNumAtoms()
        print(f"I have {count} {'heavy' if heavy_only else ''} atoms")
    def weight(self):
        mw = Descriptors.MolWt(self.molecule.rdmol)
        print(f"I weight {mw:.2f} g/mol")

class Accessor:
    """Gives access to the wrapper class from the parent class"""
    def __init__(self, to_access):
        self.to_access = to_access
    def __get__(self, obj, cls):
        # pass the object that called the class to the wrapper
        return self.to_access(obj)

class Molecule:
    """A class for molecules"""
    def __init__(self, smiles, name):
        self.name = name
        self.rdmol = Chem.MolFromSmiles(smiles)
    describe = Accessor(DescriptorWrapper)

>>> benzene = Molecule("c1ccccc1", name="benzene")
>>> benzene.describe() # __call__ method is used
I am UHOVQNZJYSORNB-UHFFFAOYSA-N, but you can call me benzene
>>> benzene.describe.weight()
I weight 78.11 g/mol
>>> benzene.describe.count_atoms(heavy_only=True)
I have 6 heavy atoms
Every time you go through benzene.describe, it calls the Accessor.__get__(benzene, Molecule) method, which returns DescriptorWrapper(benzene). So in the end, calling benzene.describe() is the same as DescriptorWrapper(benzene)() and so on.
Using the same Accessor class and a ConverterWrapper class which defines the rdkit and parmed methods, I was able to move the code of the old AtomGroup.convert_to method to the ConverterWrapper.__call__ method, and redefine the convert_to method as Accessor(ConverterWrapper). That’s a pretty neat trick to keep methods organized for users!
SMARTS selection
Something else I’ve been working on: SMARTS selection!
You can now select atoms based on a SMARTS query, and combine the selection with the other MDAnalysis selections:
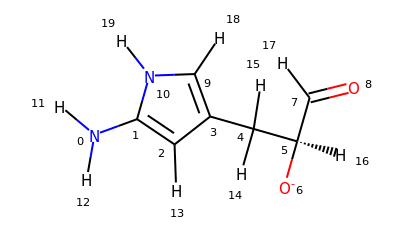
u = mda.Universe.from_smiles("Nc1cc(C[C@H]([O-])C=O)c[nH]1")
mol = u.atoms.convert_to.rdkit()
mol.RemoveAllConformers()
for atom in mol.GetAtoms():
    atom.SetProp("atomNote", str(atom.GetIdx()))
mol
# carbon atoms in a ring
>>> u.select_atoms("smarts [#6;R]").indices
array([1, 2, 3, 9])
# atoms that are not hydrogen, and not in a ring but connected to a ring
>>> u.select_atoms("smarts [$([!#1]);$([!R][R])]").indices
array([0, 4])
# carbon and next to a ring
>>> u.select_atoms("type C and smarts [$([!R][R])]").indices
array([4])
Now keep in mind that this selection combines all the resulting matches into one single match of unique atoms. If you want to iterate other C=O bonds match by match for instance, you’d have to use the RDKit converter and then iterate over mol.GetSubstructMatches(Chem.MolFromSmarts('C=O')).
That’s it for this week, I hope you’ve learnt something new 🤓!
Cheers,
Cédric